
Fix a blurry external monitor on macOS
The short version: your Mac is almost certainly running the monitor at a non-integer scale, which means every character is drawn at one size and resampled to another. The fix is to give macOS a resolution it can render at exactly 2× and scale down cleanly — HiDPI — which on most third-party monitors macOS will not offer you by default.
This is not a cable problem, and it is not your eyes. It happens on good monitors with good cables, and it is the single most common complaint about using a Mac with a non-Apple display.
Why it happens
macOS renders the interface at twice the logical size and then scales that image to the panel. On a Retina MacBook the panel is exactly 2× the logical resolution, so the scale factor is 1:1 and every pixel lands on a pixel.
On a 27-inch 1440p monitor macOS assumes a normal-density display and draws at 1×. Text is sharp in the sense that nothing is resampled, but it is small and thin, because it was designed for a 2× target. When you pick a "Looks like 1920×1080" scaled mode to make things bigger, macOS renders at 3840×2160 and squeezes that into 2560×1440 — a fractional ratio, and every glyph edge lands between pixels. That is the softness you are seeing.
4K monitors have the same problem in the other direction: the sharp mode is "looks like 1920×1080", which many people find too large, so they choose a scaled mode and lose the sharpness they bought the panel for.
Four things that actually help, in order
1. Check the cable is carrying full bandwidth
Before changing any setting: a 4K monitor running at 30 Hz over an underpowered cable looks wrong in a way people often describe as blurry. In System Settings → Displays, confirm the refresh rate is what the monitor supports. If it is 30 Hz on a 60 Hz panel, replace the cable before anything else.
2. Use a resolution the panel can render exactly
On a 4K display, "looks like 1920×1080" is the pixel-perfect mode. On 1440p, the native mode is the sharp one. If either is usable for you, stop here — you do not need any software.
Most people find one too large and the other too small. That is what the next step is for.
3. Turn on HiDPI scaling
HiDPI gives macOS intermediate 2×-rendered modes it does not normally expose on third-party displays: a 1440p monitor can run at "looks like 1706×960" or "looks like 2048×1152" while still rendering at 2× and scaling by a clean ratio. Text stays sharp at a size you can actually read.
macOS has no user-facing switch for this. Candela adds one:
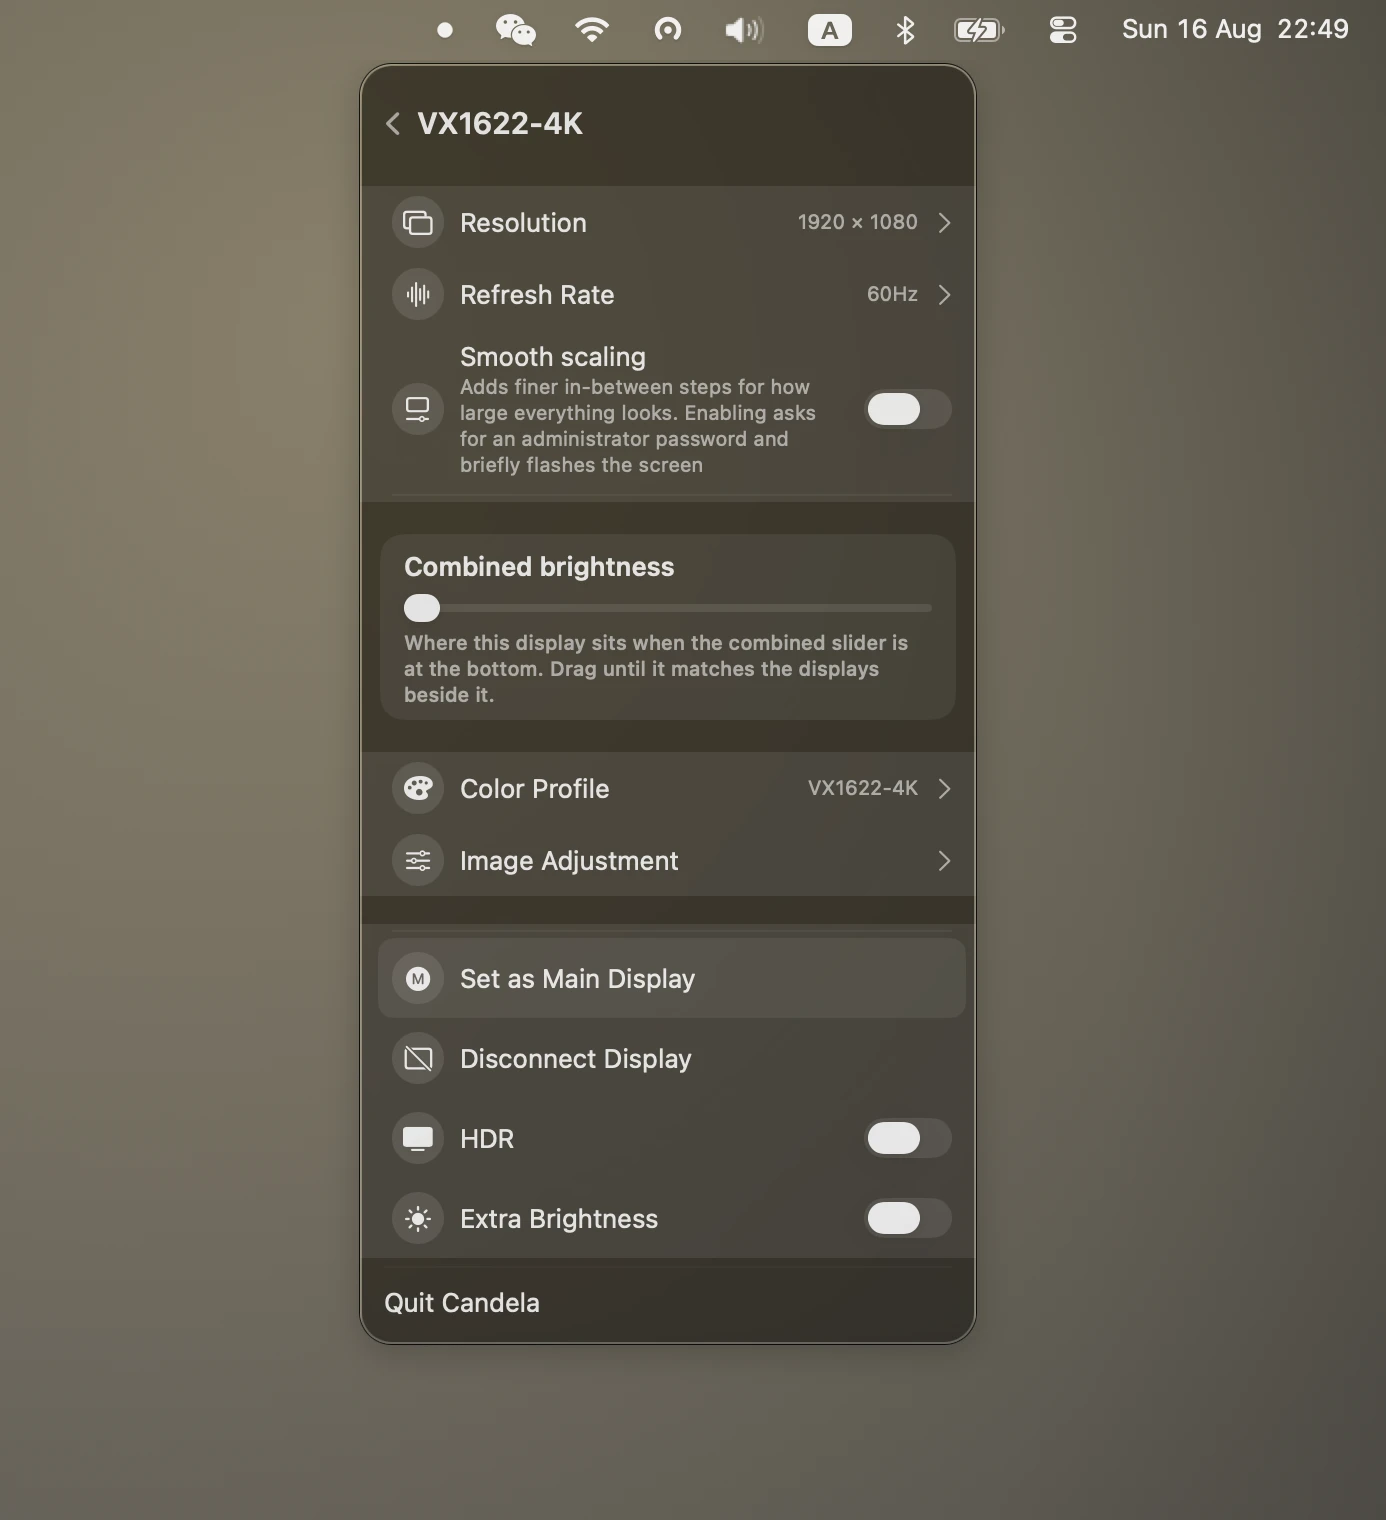
Open Candela's panel, click your monitor, and turn on Smooth scaling. macOS asks for an administrator password and the screen flashes once while the display list is rebuilt. New scaled resolutions then appear under Resolution — pick one and compare a paragraph of text against what you had.
4. Check the monitor's own sharpening
Many monitors ship with a Sharpness control set above neutral, which adds halos around text that read as fuzziness. In the monitor's on-screen menu, set sharpness to its middle value. While you are there, if the monitor has a PC or sRGB input mode, use it — television-oriented modes apply processing that softens text.
What does not help
Turning off font smoothing. defaults write -g AppleFontSmoothing -int 0 is
widely recommended and mostly makes text thinner rather than sharper. It treats a
symptom of the wrong render scale. Try the resolution first; if text is still too
thin for you afterwards, then consider it.
Buying a different cable, again. Once the refresh rate is right, the cable is not your problem.
Increasing the resolution past native. A 1440p panel has 1440 rows of pixels. Rendering more does not create detail; it costs GPU time and can add its own resampling.
How to tell it worked
Put a text-heavy window on the external display and look at the horizontal strokes of lowercase letters — the crossbar of an "e", the top of an "r". At a fractional scale these are grey and slightly different from one letter to the next. At a clean scale they are crisp and identical.
Then take a screenshot of the display. If the PNG's pixel dimensions are exactly twice the "looks like" resolution, you are rendering at 2× and scaling cleanly.
Related
- How to enable HiDPI on a Mac
- Make the brightness keys work on an external monitor
- Candela vs BetterDisplay vs Lunar
Download Candela — free, open source, macOS 26.